


30
Jun
Bird Photography Tip: Be Smart, Sharpen Like A Pro
- By Gaurav Mittal
- 4 Comments
An important bird photography tip about sharpening images like professional photographers is to not overdo it. Most experienced bird photographers will tell you is that an image fails to make an impact not just because of lack of technical perfection, drama, emotion or the story telling but simply because the image was over sharpened, looked crunchy with appearance of sharpening artifacts. When I look through images, I’m able to tell the effort a photographer made in making that image. That photographer reminds me of a long distance runner who ran a great big distance only to go bust just before the finish line. You did all that hard work to make that image but just fell short in post processing and that too at the very end.
As a bird photographer, I cannot emphasize enough how important it is that your images look tack sharp, this holds true also for other Nature & Wildlife Photography. We are consistently striving to make an emotional and dramatic connection through eye contact with our subjects and as a photographer making sharp and clear images convey and transfer that drama and connection to the audience. In post processing, there are various techniques that can be applied to optimize images for maximum sharpness without over doing it.
I use various sharpening techniques depending on the image and how it looks to me. The most frequent technique I use is “Smart sharpen” found in Photoshop. I will go over this technique but before I do it is important to understand that sharpening should be the last step in post processing and should be done after the image has been re-sized as per need. I want to show an example of what many images look like and I’m sure you have seen this affect over and over again.
Bird Photography Tip: Getting it wrong
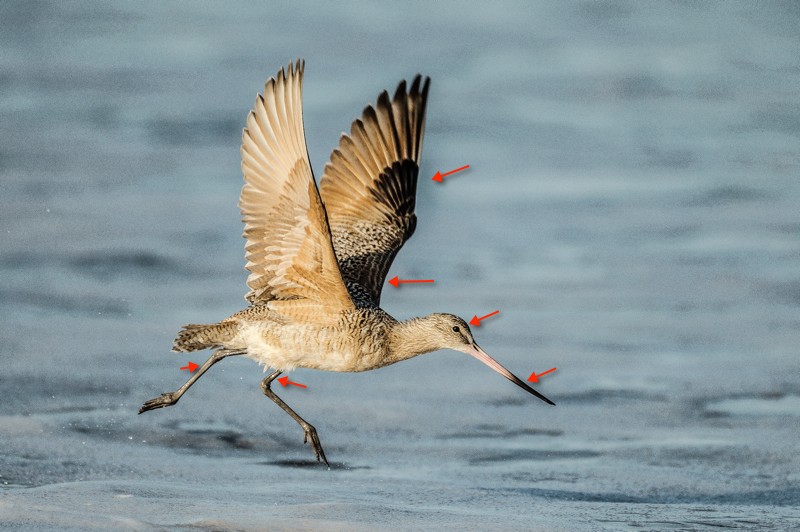
The composition, drama, and those wings, this would have been a killer shot if not for the over sharpening applied. You can clearly see by the marked arrows a halo going around the bird. A halo is a distinct dark or bright line that is seen at the edges that separate the foreground and the background, it becomes more apparent around contrasty edges. Sometimes, a halo may not be outright visible and a way to tell is to tilt your screen back or forward and pay close attention to the hard edges.
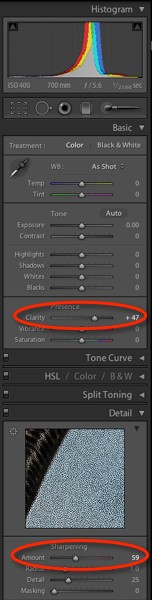
The crunchy appearance and over sharpening here are a result of extreme adjustment made to the Clarity and the Sharpening Amount slider found in raw converters like Lightroom and ACR followed by further sharpening applied in PS.
Bird Photography Tip: Creating and a saving a selection
Your first step when you open an image in Photoshop for post processing should be to create a selection around the main subject; this can be done using the “Quick selection” or the “Magic wand” tool from the selections Panel on the left. Keeping the tolerance level somewhere between 6 and 8 start drawing around the bird, in case the selection goes over the subject, hold down the option key and a (–) sign will appear, this allows you to back off the selection. As shown by the arrows once the selection is complete you will see what is known as the “marching ants”. Save the selection by going to Select > Save selection > Name and save, now go to Select > Deselect to close out the selection. The selection is a good way to isolate the subject from the background and as you will see it will avoid applying sharpening beyond the edges. Selections are also very useful when processing images for color correction, exposure adjustment etc.

Bird Photography Tip: Resizing the image
Image resizing is the last step and should be done right before the sharpening is applied. I have noticed that when you re-size an image there is a slight loss of details, so after resizing applying sharpening is effective in bringing back the details. First if you have any active adjustment layers then go to Layers > Flatten layer, then go to Image >Image size and the box bellow will open. Since I’m sharpening for the web I have selected the image to be 800 pixels wide, you will notice when a value is entered here the height changes automatically, this happens because Photoshop will maintain the aspect ratio of the image, it is indicated by the chain link icon to the right of the value. Make sure that the constraint proportion box is checked, which controls the aspect ratio of the image, without this checked the width and the height will not be linked, leading to distorted looking images.
My thought on the resolution debate, after much research I’m now a believer that it does not matter weather you select 72 or 300 resolution while resizing, why? because resolution does not have an affect on how images look on the web, it matters only when printing. Any one who would like to argue on this can send me an email and I can send links on some resources which will set the facts straight.
Lastly. the last box on the bottom should be set to “Bicubic (best for smooth gradients).

Bird Photography Tip: Smart sharpening applied
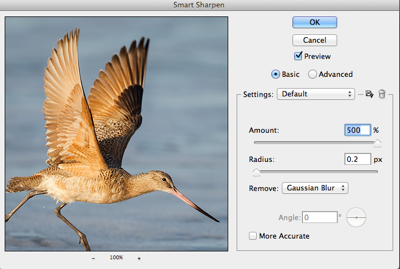
It is now time to apply sharpening. With the re-sized image open go to Layer > Duplicate layer. You now have a copy of the background layer, rename it to “sharpen” on this the sharpening will be applied. Go to Filter > Sharpen > Smart sharpen, the following box will open where you will be selecting the parameters; enter 500 for the Amount, 0.2 for the Radius. At this point you may or may not notice some sharpening artifacts around your subject, click on the preview button to see the change. If needed a second round of sharpening can also be applied by repeating the same step but this time enter 150 for the amount and adjust as needed.
Presently the sharpening has been applied to the whole image, but we only want to sharpen the main subject and not the background. We will now load the previously saved selection, go to Select > Load selection > Channel, the “marching ants” will appear around the subject. With the Sharpen layer selected go to Layer > Layer Mask > Reveal selection. You can see below that a layer mask has been applied with the subject selected as white and the background as black.
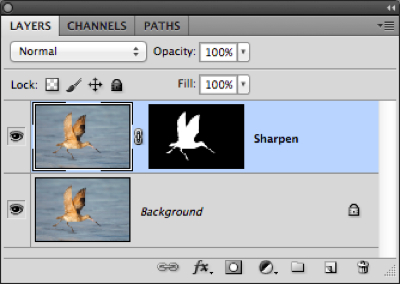
When working with layer masks remember that black conceals and white reveals. Once the selection is loaded and a layer mask is applied, Photoshop sees that selection as an indication for the changes to affect the subject only, the black area is hidden and the sharpening is not affecting the background. At this point it is important to look at the image closely and inspect the sharpened areas, if certain areas look too sharp then load the selection and with the brush tool set to black (remember, it conceals) and an opacity of about 30 percent paint over and reduce the sharpness. The overall sharpness can also be reduced by lowering the opacity.
Bird Photography Tips : In conclusion
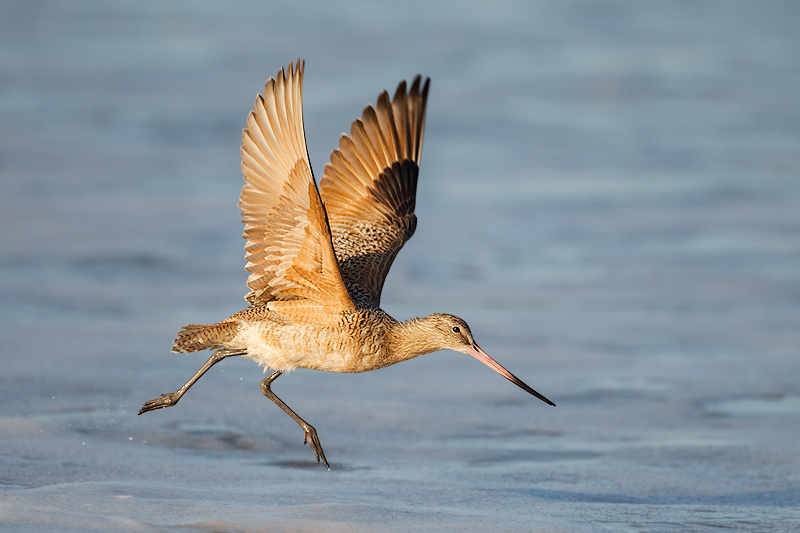
Canon ID Mark IV, Exposure 1/2500sec, F/5.6, ISO 400, Lens 500mm
You can see the transition of this image from where we started. It is the same image but processed with care and a work flow I have created for myself. We all know that there are multiple ways of doing the same task in Photoshop and it is the same when it comes to sharpening images, once you find the method that works best for you I suggest that you stick with it and tweak along the way. I also like to try out other third party sharpening filters such as Define 2.0 from Nik software. In previous posts I have shared some Bird Photography Tips and the one that you can come away with from this post is that your goal should be to shoot sharp in the field and then apply proper techniques in post processing to optimize images.
November 24, 2014
Thanks Gaurav. I had never tried this method of sharpening by selecting quick selection. Guess this trick masters seldom reveal.
December 4, 2014
Sure Pranay. It is always good to share and promote learning.
November 23, 2016
very well written. thank you.
November 28, 2016
You are welcome.
Submit a Comment