


30
Aug
Learn Flash Use in Bird Photography and Expand Your Photographic Horizon
- By Gaurav Mittal
- 2 Comments
In a recent interview, I was asked the question, what are some of the challenges you face in bird photography? I thought for a while as to how to sum it all up in the best possible way and here is what I said, “wildlife photography in general is a very challenging form of photography, elements of nature such as weather; lighting conditions and a cooperative subject are not in a photographer’s hand. Many a times, regardless of all the preparations we make, even if one of these elements is missing then the photographic opportunities are lost.”Birds by far are amongst the hardest subjects to photograph; they are shy, timid and never stay in one place for more then a few seconds. In these situations reading the light, the background and then framing the shot while getting the correct exposure is critical, knowing an effective combination of aperture, shutter speed and ISO is very important in order to be creative, often we come back empty handed and have to keep trying. Logistical planning and long travel schedules also add to the challenge of photography.

1/640sec F/5.6 ISO 1250, Canon IDX, 600MM
In late April I travelled 6000 miles from India to Washington DC and then another 2500 miles from D.C. to Morro Bay in California to shoot (not literally!) shore birds, especially the gorgeous Marbled Godwit and the Willet. By lessons and practice you will understand the exposure theory, you will even develop the ability to understand bird behavior and the hours of patience that is needed to come up with one beautiful image, but there is nothing you can ever do to prepare for a situation when you travel the distance and weather gods decide to play a spoiler. On the day I arrived in Morro Bay, conditions were bright and sunny; the forecast for the next few days also looked the same way, but as bird and other wildlife photographers know better, mother nature might have different plans altogether.
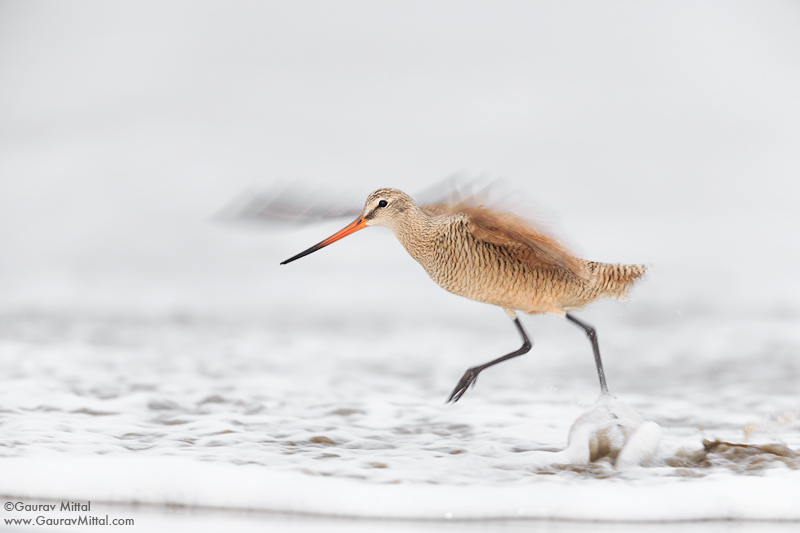
1/200sec F/5.6 ISO 2500, Canon IDX, 600MM fill flash -2 stops
Low light and overcast conditions are some of the hardest factors to deal with in photography and yet you can come away with pleasing images, you need the right tools and good skills to save you from having a bad day in the field. In these situations a flash is an effective tool, out in the field it is important to quickly set the ambient exposure for the background and then set the correct flash exposure for the subject, the challenge of flash photography in an ever-changing wildlife scenario is knowing that you are working on two separate exposures in one image. For the image above and for flash usage on birds I generally use a better beamer attached to my Canon EX 580II flash, which then is mounted on an off camera flash mount via a flash sync cord. More on flash setup in a bit. This image of the Marbled Godwit was created under very low light due to overcast conditions; with the help of a flash I was able to get a catchlight in the bird’s eye, the slow shutter speed allowed the motion blur on the birds wings which gives the viewer an impression of the birds movement. The feel of this movement created a dynamic looking image.
1/250sec F/7.1 ISO 1000, Canon IDX, 600MM, fill flash -2 stops
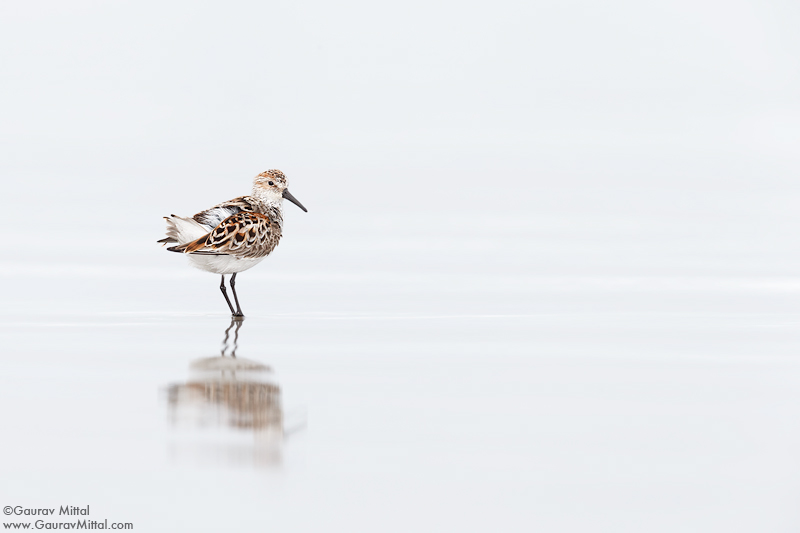
In bird photography, a catch light in the bird’s eyes makes all the difference between making an effective image versus a lifeless image. A catch light gives us a reference point as to the direction in which the bird is looking; this helps in creating a connection between the bird and the subject. While you could open up to a wider aperture or increase the ISO to add more light, it is important to understand that a wide aperture will reduce the depth of field and may cause parts of the bird to be unsharp and a high ISO will introduce noise which may render the image grainy. These choices may effectively manage the ambient exposure; you will however still not be able to get the catch light that adds a spark to the bird. In the absence of sunlight a flash is an ideal solution for adding a catch light as well as exposing the bird correctly. A few drawbacks of the flash are that it can produce flat looking images and make the subject look washed out if exposed incorrectly, while working with flash it is also important to remember that your goal should be to make the image appear as natural as possible and avoid an electric look.
In the image of the Sanderling above, the eye contact would not have been powerful if there was no catch light in the birds eye, without the use of flash the eye would have been dark and the connection not so intimate. A word on composition here, before I photograph birds I pay attention to the surroundings that I’m in along with the bird. My attempt is to make images that incorporate a sense of those surroundings and let the viewer experience the mood in the image as well. Here, I choose to make use of the wide-open space and put a lonesome Sanderling in it, depicting the beach on which I was all-alone for miles on all sides. There was a sense of emptiness and yet calm prevailed.
This blog post is about showing you that on days when you encounter overcast conditions or poor light, it is not only possible but also imperative that you get out and shoot because a flash is an important tool, which once you learn to use, will provide you with endless photographic opportunities where they seemed none.
The thought of using a flash in wildlife photography can be intimidating but it is easier than it feels , by arming yourself with knowledge and putting the necessary tools in action it can provide endless possibilities of creativity. Below are some key points and terms that need to be understood and taken into consideration while working with flash:
- You will need a better beamer, flash, off camera flash mount brackets, flash sync chord. Click here for more details on a basic setup.
- Meter for ambient exposure by shutting of the flash. Then check the flash exposure by focusing on a perch where the bird lands. This is where the process of combining two exposures into one begins.
- Check the distance to the subject, you can roughly guess the distance or check the distance indicator on the lens. Remember that a better beamer effectively doubles the range of flash output. If the distance to subject is 25 feet then the flash output will reach 50 feet, half the distance to 12.5 feet and input that into the flash, the distance scale is located at the bottom of the screen on the flash.
- Manual mode in flash works best if shooting a subject at a fixed distance. You control the flash output for a given distance, same result every time and you can change the output when needed.
- The shutter consists of two curtains that move across the sensor frame. For the entire frame to be exposed to the flash, your shutter speed needs to be slow enough that the first curtain has completely cleared the sensor area before the second curtain starts moving. At that point the flash is fired.
- Remember to turn on High Speed Sync; it is the third button from the top on the 580 EX II below the LCD panel, consult your camera specific manual to locate the button. HSS allows you to work with higher shutter speeds then the maximum sync speed, this lets you expose for ambient light and use the flash separately to light the main subject. This is where you can do some creative shooting with lighting effects.
- Maximum sync speed is the fastest shutter speed at which the entire sensor frame is still open for flash to expose the frame evenly. For most camera’s it is either 1/200 or 1/250sec.
- Wait for the right moment to shoot and only take one or two shots at a time, flash needs time to recycle back to full power, it will reduce the chance of an underexposed image of a subject that was posing beautifully but you just did not have the flash at full power.
- Always use a battery pack, the recycling time is faster and it will give you more flash time. I have gone a full three days before needing a recharge.
- Try to keep from over flashing your subject; your goal should be to make images that give a natural and not an electric look.
Your goal as a photographer should be to come back with a portfolio of images that showcases the impact of various lighting situations on the subject as well as your understanding of working in those situations. Learning flash use in bird photography will add dynamism as well as increase your photographic horizon.
Most of my photography trips last anywhere between a week to ten days, this gives me ample time to scout for new locations and also increases the odds of working in a mix of cloudy and sunny days, a combination that lets me make use of flash as well as the natural light.
The images below were made over a period of a week where I photographed these birds in different lighting conditions.
Willet: Meditating
1/1600sec F/5.6 ISO 800, Canon IDX, 600MM
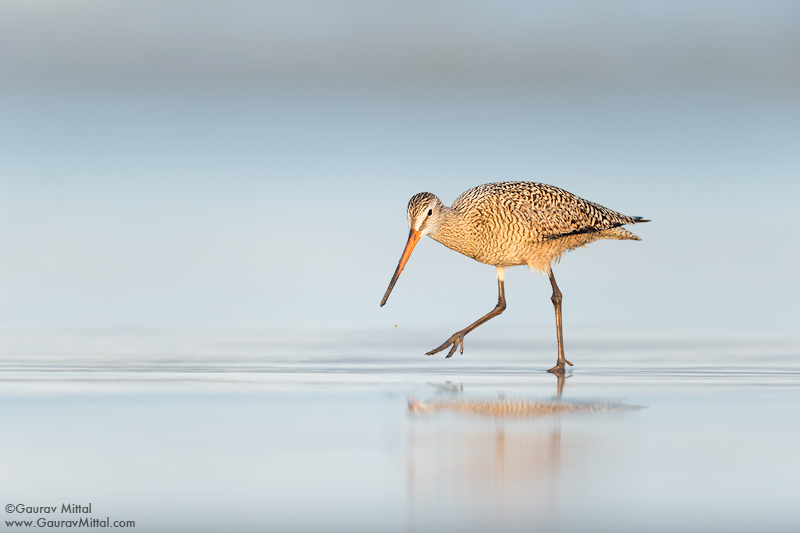
Marbled Godwit: Portrait in early light
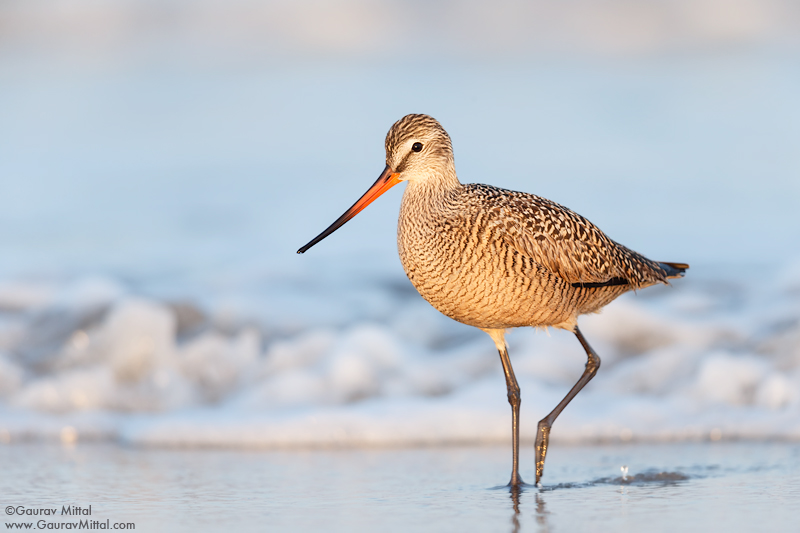
1/640sec F/5.6 ISO 1250, Canon IDX, 600MM
Marbled Godwit: Catch that last drop
1/640sec F/5.6 ISO 1000, Canon IDX, 600MM
Marbled Godwit: Bubble feet

1/1250sec F/5.6 ISO 800, Canon IDX, 600MM
Marbled Godwit: Just you and me
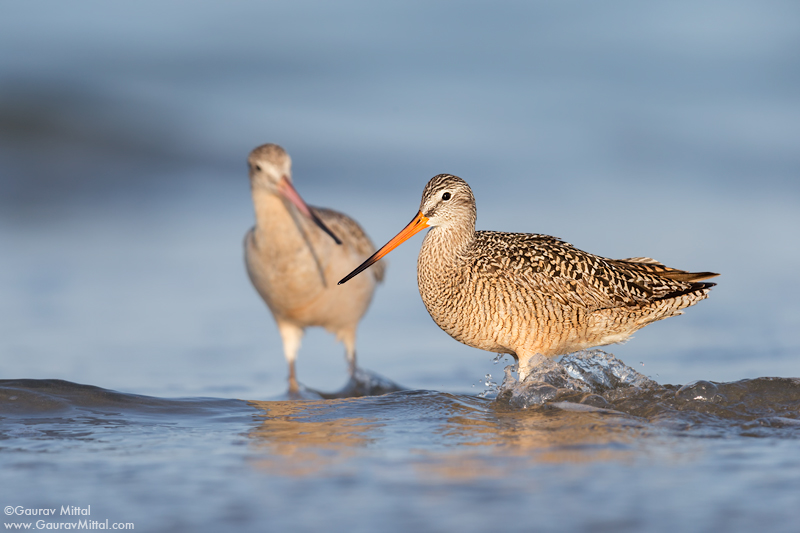
1/2000sec F/5.6 ISO 800, Canon IDX, 600MM
This article also appears in the July/August 2014 issue of the Wildlife Photographic magazine.
May 20, 2016
Stunning images Gaurav and what a distance to travel! I live in California and after seeing these, I need to make a road trip back down to Morro Bay!
I don’t use flash that often with birds, but now you have totally inspired me! I particularly love the lower shutter speeds combined with the flash. On my must try next list!
May 31, 2016
Thank you for your kind comments Jacqueline.
Submit a Comment